Sew Simplified
If I can sew, anybody can. So let's start sewing!
HOW TO MAKE A FABRIC BOOK COVER
The knit book covers sold at stores are easily torn and damage the spine of the big thick books. A fabric book cover is easy to make and washable and can be reused.
MATERIALS
1. Home Dec fabric (13x34)2. Horizontal Badge Holder
STEPS
1. Place the book on a flat surface. Measure the length (top to bottom) of the book. In this case it is 11.25”.2. Measure the book from one edge to the other including the spine. Place the measuring tape upside down so that you can see how much the measurement is while the tape is under the book. My book measures 18.5”
3. Although the seam allowances are 5/8 but I like to cut the fabric a little bigger. For my book I cut the fabric 13 “(in length wise grain)
4. And 34” (in cross wise grain). The 34” included the hem allowance+ fold over fabric for the right and left sleeves of the book cover. The fold over fabric can be 3-7 inches depending upon the size of the book. I try to fold the fabric 3 inches away from the spine.
5. I use the “ripping method” to cut out the piece.
6. I start ripping from the both cross-wise and length wise grain, until the both tears reach at one point, and the fabric is piece is separated.
7. Iron the whole piece. You can use the steam if you want to.
8. Fold over one inch hem on the short side. I use the card stock strips I have cut in different lengths.
9. Then fold over half an inch from the raw edge making sure not to iron on the 1” mark.
10. Fold over the hem first at ½ inch then 1” marks and iron it again.
11. Pin the fold if you want to. But the fold is so crisp that you can skip this extra step.
12. Repeat steps 8-11 for the other edge. I try to use the selvage edge and I iron it only once, to fold the whole edge. There are no threads sticking out, so I find no need to double fold it.
13. Remember the edge to edge measurement of the book was 18.5”. Fold the fabric and measure half of the width (in this case 9.25“) from the folded edge.
14. “Pin mark” both the layers on both sides with the glass head pins.
15. Take the fabric to the ironing board. Unfold the fabric. Start from one edge. Hold pin on both sides, fold the fabric wrong sides together.
16. Iron the crease. Use steam to set the crease. You can iron over the pins.
17. Take out the pins. This will make the sleeve or pocket to insert the book in.
18. Repeat steps 15-17 for the other side.
19. Hem the ironed edges (Step 10) on both sides. Use the matching thread in the machine and use a straight stitch.
20. Sewing the selvage edge.
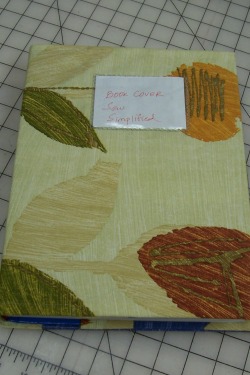
21. Plastic horizontal badge holders can be sewn on the front of the book cover for the information.
22. Cut the lanyard attaching part with paper scissors.
23. Fold over one side at the ironed crease (Step 17) and measure 2 inches from the top.
24. Place the badge holder 2” from top and 2” from the folded side. You can use the ordinary glue stick to hold the badge in place temporarily.
25. Use the Multi stitch zig zag stitch all around the edges of the badge at 3.0 length and width. It is number 5 on my Singer Futura.
26. Make sure that you do not sew over the open part of the badge.
27. Fold over the sleeve or pocket at the crease but right sides together and sew with a serger with 5 thread safety lock. It is stitch A for the Singer Quantumlock Serger. This stitch can be replaced by stitching it straight and then zig-zagging the edge with the sewing machine.
28. Measure 11.25” from the sewn edge (width) and draw a line.
29. Pin on the left side of the drawn line. This way the pins do not come in way of the serger sewing.
30. Sew exactly on the line. The left over fabric on the right side is cut giving a clean edge to the sides.
31. Turn the cover inside out.
32. Iron the cover, folding the edges in between the fold.
33. The chain stitch from the serger stitching of the sleeves leaves a guide line for folding.
34. Straight stitch it with sewing machine back stitching at the beginning and at the end.
35. Your book cover is ready.

